A nautical chandelier

Nothing reminds me of summer like the beach. Since I can't be at the beach right now, I figured bringing a little beachy-inspiration home might help in the meantime.

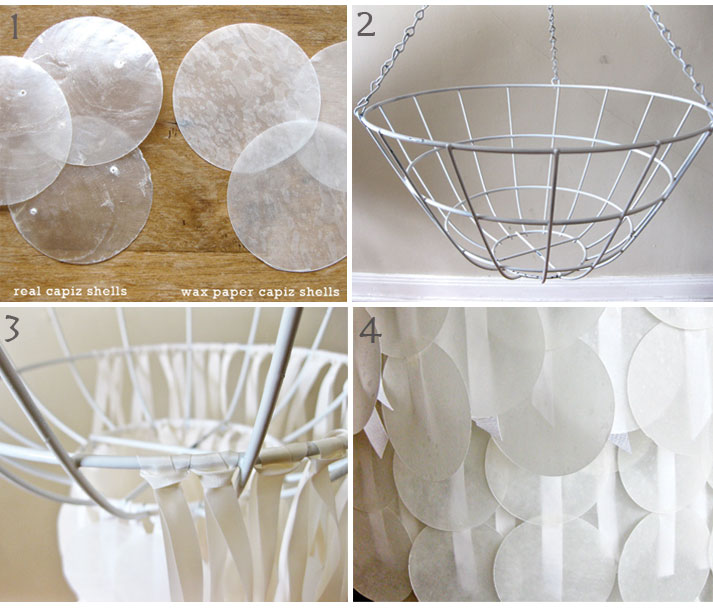
And this... is our weekend project, thanks to Design*Sponge. Isn't it fabulous to know that you can Do It Yourself??? Haha, but seriously, look at how easy it {hopefully} is...

Supplies:

- hanging planter basket - white spray paint - ribbon - scissors - 1-2 rolls wax paper - 2 big pieces of parchment paper -  iron - hot glue gun & glue sticks - circle cutter (i didn’t have any luck with a “punch”) - cutting mat


For directions on "how to", visit Design*Sponge and be sure to take some time to poke around on their site. There is much to adore!

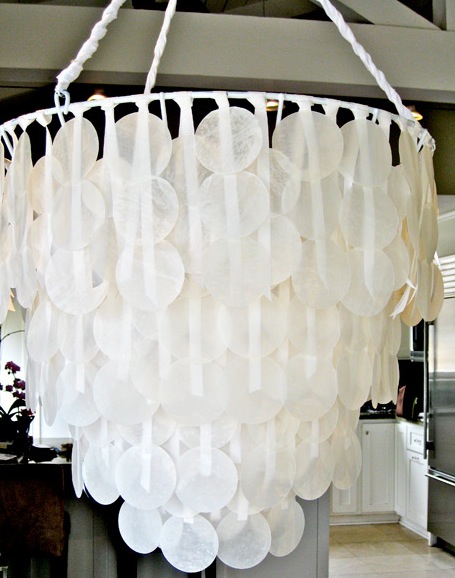
I hope my chandelier looks as lovely as this one!!


*Photos courtesy of Daniel Sinner & Design*Sponge

Hand made perfection

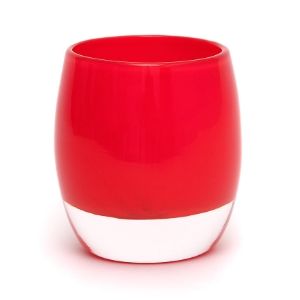
Happy Monday - After - Mothers Day! Did you show your mom some love this weekend? We are so blessed to have such wonderful mothers... one day of celebration just doesn't do them justice! Several years ago while living in Seattle, I started the tradition of getting my mom Glassy Baby's for Mothers Day.

After stumbling across the humble workshop {formerly in Greenlake}, I spent some time talking with the owner and watching the magic of each individual piece being created... and falling in love with these little babies! Since then, Glassy Baby has become a staple in many homes as candle holders, cups, toothbrush holders or bud vases.

They come in soooo many different colors and to make us love them even more, certain colors are tied to causes which receive a percentage of the revenue, such as:

{Happiness: 10% from the sale of each "happiness" Glassy Baby will be donated to Gilda's Club New York City to support cancer patients and their families}

If you're nerdy like me, you might enjoy seeing how they're made. :)

I'm kicking myself for failing to carry on the tradition of this Mothers Day gift this year.... they're just so beautiful, don't you agree??


Hello March

You could call it Part II to our wall paper post because yet again we found a fabulous way to brighten your surroundings and spice up those old walls! Yes, it's adhesive and it's vinyl so you can actually write on it! This colorful calendar from Scribble on Everything seems like the perfect addition to an office wall to keep all those important dates at the forefront of your mind... or perhaps to spice up a wedding count down? What do you think- worth it for $80? undefined

Oh, and if you're crazy like us, you may even try and guess the Pantone of each month!!! {At least we know that's crazy, okay}

undefined


*Photo courtesy of Scribble on Everything

Float away

Back in the day balloons were a permanent fixture in all party decor. A party wasn't a party without balloons, right? And there's always the token attendee who squeakily shouts toasts after sucking down some helium. Well, honestly, we're kind of crushing on them again... and this is why:

{via}

{via}

{via}

Sharing in our obsession yet??

{via}

{via}

{via}

Okay, now lets all go to Paris and play with balloons, shall we?

Happy FRIDAY!!

*Photos courtesy of respective sites

Dress up those walls

One trend that we can't get away from and can't get enough of is WALLPAPER! The thought of it may bring not-so-pretty memories of your childhood and what seemed like a good idea in the 80's or 90's... but don't let that ruin it for you!  Take a peek at some fresh new looks that we're obsessing over. {ohhhh how we love paper} Oh, and if you're a renter, don't be discouraged. There are a plethora of options for temporary, self-adhesive wallpaper including Tempaper Designs and Sherwin Williams. Gaze on and be inspired!

Photos clockwise starting in top left corner: Remodelista; Desire to Inspire; Small Place Style; KID Collective; New House of Art; My Deco; Houses of Turquoise; Graham and Brown

DIY: old books = new art

Considering how much we love paper, it shouldn't come as a surprise that we were, well, attracted to this DIY we saw on the Jones Design Company blog. How can you resist? We are dying to get our hands on some old books of poetry and music sheets to compile a collage for our own walls. To see the step - by - step directions for how to transform this:

To this: Visit the Jones Design Blog... and plan to get distracted :)

Holiday Arrangements

Tis the season for dinner parties and get togethers! In light of Christmas being around the corner, we wanted to share {via Studio 539 Flowers} some festive floral arrangement ideas that are fitting for table centerpieces, decor or hostess gifts. We snapped a few iPhone photos {below} of some new arrangements, and you can see the cooler is packed full of red and greens... these folks are ready to take on the holiday madness! Arrangements begin as low as $40, and they can deliver to Providence and the surrounding areas. p.401.454.4400

We had the pleasure of getting together with Azure Photography to shoot some more of our favorites. Tell us yours! Christina suggests adding some SPARKLE for a chic, classy look or PINE CONES for a classic, rustic look.

If you're reading from afar, fear not, because these designs can still inspire you to create something beautiful! Be sure to check out their blog for more and follow them on facebook, too!

DIY: Vintage Stamp Ornament Tags

Vintage things are fun, mysterious and loaded with personality. Vintage Stamps, postcards and all things paper are our favorite, of course, but being able to repurpose those things makes us borderline euphoric, really. Well, apparently we will be hitting up our vintage stamp vendors for more than just invitations... feast your eyes on these pretty little hand made ornament gift tags, designed by the creative minds behind the D. Sharp Journal.

How great are these colorful tags? You can find the template here and follow their easy directions. Also, here are some of our favorite places to find the other supplies you'll need.

Vintage Stamps, Champion Stamp or ebay

Bakers twine, Crate and Barrel, $7.95

Have fun crafting!!

*Top photo courtesy of D. Sharp Journal

A Holiday Nest

As if the holidays aren't magical enough, some of our fabulous clients are heading into their first Christmas with their new spouse. We fell in love with these custom ornaments from Austin based Paloma's Nest - a company who succeeds in every way at their goal to be "dedicated to creating Handcrafted Modern Heirlooms - pieces for the home and for the heart."

Here are just a few that would be a thoughtful gift for any of the newly weds that you might know... or even for yourself and your hubby! What a lovely way to celebrate an extra special holiday season!

Or perhaps you're looking for something to spice up the presentation of a gift? Of course, they've still got you covered! We can't get enough of these guys!!

Thanks Paloma's Nest, for making such beautiful and sentimental things!

*Photos courtesy of Paloma's Nest

A New Art Form

For some people, like our friends at Totally Tabletops {in Seattle, WA}, setting the table is an art. When the holidays roll around, it's easy to focus on perfecting the timing of the cooking, getting the sweet potatoes just right, seasoning that stuffing to perfection and all the other good stuff, but we must not forget about the table! While the holiday is focused around giving thanks, football, food & guests, adding a special touch to the table can add a spark of extravagance. First and foremost, make sure you're setting the table correctly and THEN... be inspired to try your hands at this art form!

{via Totally Tabletops}

{via Christiane Lemieux of Dwell Studio}

{via Martha Stewart}

If you're looking for centerpiece ideas, here are some simple ways that you can spice up candles.

{via BHGGood Housekeeping}

{via Napa Style}

Have fun decorating that table! Happy hosting, folks.

Happy Halloween weekend

Halloween weekend is here are we're feeling pretty stinkin' festive. Yes, it's true that we're about to set out on a journey to scrape together a semi-classy costume for tonight, but our procrastination has nothing to do with a lack of festivity- we've been BUSY!! In the spirit of this holiday weekend and with Thanksgiving on the horizon, we couldn't resist passing along a fun little D.I.Y from Martha Stewart. We're thinking of varying gold, copper and orange mini-glitter pumpkins for place cards at the Thanksgiving dinner table.

Find out how to make these cute little guys here. Have a very merry & safe Halloween weekend!

*Photo courtesy of Martha Stewart

DIY: Rosette ruffle pillows!

Seeing the final product of a Do-It-Yourself {DIY} is so exciting. Even just looking at the "recipe" for how to make it - to know all of the "ingredients" and the step - by - step directions, is inspiring in it self. Take this gorgeous ruffle pillow from Felt Furnishings, {via The Storque} for example...

You will need the following:

  • Feather pillow insert, 10 x 18" (25 x 45cm)
  • For the pillow cover: 23 1/2 x 19" (57 x 47cm) orange felt or felted woven-wool fabric
  • For the folded rosettes: 20 x 18" (50 x 45cm) orange felt or felted woven-wool fabric
  • Matching zipper, 18" (45cm) long — optional
  • Matching sewing thread
  • Basic sewing kit
  • Sewing machine

And here's how you make the magic happen:

1. If you wish to make a pillow back with a zipper, cut out three pieces of felt for the pillow cover — one piece measuring 11 x 19" (27 x 47cm) for the front and two pieces measuring 6 x 19" (14.5 x 47cm) and 6 1/2 x 19" (15.5 x 47cm) for the back. If you wish to make a sewn-in pillow back, cut the back panel to the same measurements as the front. To make the rosettes, cut out 60 felt circles with a 3" (7cm) diameter.

2. Pinch each felt circle in the middle, and fold the sides in to form a rosette. Hand-stitch the base of each folded rosette to hold it together.

3. Starting at one end of the front pillow panel, hand-stitch the rosettes onto the fabric, stitching neatly and securely through the base of each one.

4. Continue adding rosettes, positioning them very close together to form a dense, wide row of rosettes through the center of the pillow panel. Make sure that the row of rosettes is straight and that there is the same amount of undecorated base fabric on either side of the row.

5. Make up the pillow back and join the front and back following one of the two options below. Insert the pillow form into the finished cover.

For instructions on how to make up the pillow back, visit The Storque's posting. While you're there, find out more about what inspired this book on Felt design ideas and also be sure to peek at some of their other fantasticly fun DIY ideas!! Perhaps one of these days we'll post pics of our humble attempt at this... once we get our little paws on a sewing machine again :)

*Photos courtesy of Felt Furnishings

A sucker for seersucker

Once upon a time, a young woman moved into her very own apartment. Being that this was the first time sans roommates, she had free reign on the decor... and things had to be just right. For the sake of keeping said character anonymous, we'll call her Hannah. Anyway, Hannah searched high and low for the perfect shower curtain - it even became an obsession. She scoured all of the usual stores: Target, Macys, Crate and Barrel, Anthropologie, Urban Outfitters... the list goes on... until one day a conversation with a certain stranger led her to India Rose. This adorable online boutique (with one physical location all the way in Cali) sells some of their goods at Anthropologie and other equally lovable stores. Well, it was love at first seersucker when Hannah's eyes met this fabulous, feminine and preppy curtain.... and it's been bliss ever since.

Well, Hannah's success story keeps us coming back to see what gorgeous goods India Rose has in store. Take for instance the recently introduced Anna Rose collection that we are totally crushing on. What a lovely color combination AND more seersucker?!?

Let's be honest. If we ended up with this duvet, we would really have to consider getting a new shower curtain too. After all, how perfect would this one be:

We can always appreciate when design, detail and quality come together.

*Photos courtesy of India Rose