DIY: old books = new art

Considering how much we love paper, it shouldn't come as a surprise that we were, well, attracted to this DIY we saw on the Jones Design Company blog. How can you resist? We are dying to get our hands on some old books of poetry and music sheets to compile a collage for our own walls. To see the step - by - step directions for how to transform this:

To this: Visit the Jones Design Blog... and plan to get distracted :)

Our Monday obsession.

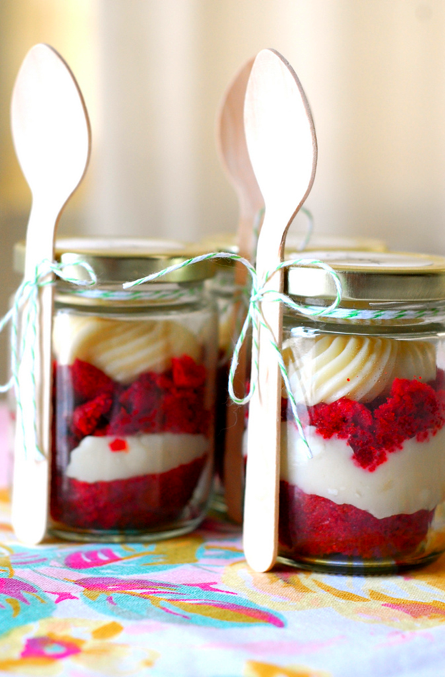
Cupcakes are pretty close to being perfect on their own, but putting them in adorable containers that allow for fabulous party favors to-go makes us speechless. You see, some of us at Paper Moss (who shall remain nameless) don't have that 'special touch' when it comes to baking. Oh they taste good, but their appearance wouldn't make you think so. In other words, this DIY might be the perfect fit for those of us that need some help in the presentation department. Gotta love projects like that! Now for those of you who don't share our little problem... well, this should be a cake-walk.

{red velvet cake & cream cheese frosting, oh my}

Get the directions on the Cakies blog.

Thank you Cakies, for being so cute and brilliant!!

*Photo courtesy of Cakies

Holiday Arrangements

Tis the season for dinner parties and get togethers! In light of Christmas being around the corner, we wanted to share {via Studio 539 Flowers} some festive floral arrangement ideas that are fitting for table centerpieces, decor or hostess gifts. We snapped a few iPhone photos {below} of some new arrangements, and you can see the cooler is packed full of red and greens... these folks are ready to take on the holiday madness! Arrangements begin as low as $40, and they can deliver to Providence and the surrounding areas. p.401.454.4400

We had the pleasure of getting together with Azure Photography to shoot some more of our favorites. Tell us yours! Christina suggests adding some SPARKLE for a chic, classy look or PINE CONES for a classic, rustic look.

If you're reading from afar, fear not, because these designs can still inspire you to create something beautiful! Be sure to check out their blog for more and follow them on facebook, too!

DIY: Vintage Stamp Ornament Tags

Vintage things are fun, mysterious and loaded with personality. Vintage Stamps, postcards and all things paper are our favorite, of course, but being able to repurpose those things makes us borderline euphoric, really. Well, apparently we will be hitting up our vintage stamp vendors for more than just invitations... feast your eyes on these pretty little hand made ornament gift tags, designed by the creative minds behind the D. Sharp Journal.

How great are these colorful tags? You can find the template here and follow their easy directions. Also, here are some of our favorite places to find the other supplies you'll need.

Vintage Stamps, Champion Stamp or ebay

Bakers twine, Crate and Barrel, $7.95

Have fun crafting!!

*Top photo courtesy of D. Sharp Journal

Addressing 101

If you caught our post on Friday, maybe you were ooo-ing and awe-ing at the art of hand calligraphy right there along with us. If calligraphy isn't in your budget or if it's not your style, there are certainly other options. If you choose to do your own addressing, here is everything you need to know to make it happen, according to Peggy Post from the Emily Post Institute. One Envelope or Two? Traditionally, a wedding invitation is sent in two envelopes, an outer envelope which is addressed and stamped, and an inner envelope—containing the invitation, reception card, reply card and other material such as directions—which bears the names of the people invited. Although it may seem complicated or overly formal, a second envelope is actually very practical because it clarifies exactly who’s invited: other family members, children, and whether or not an invited guest may bring a guest. It’s perfectly acceptable, however, for a couple to omit inner envelopes.
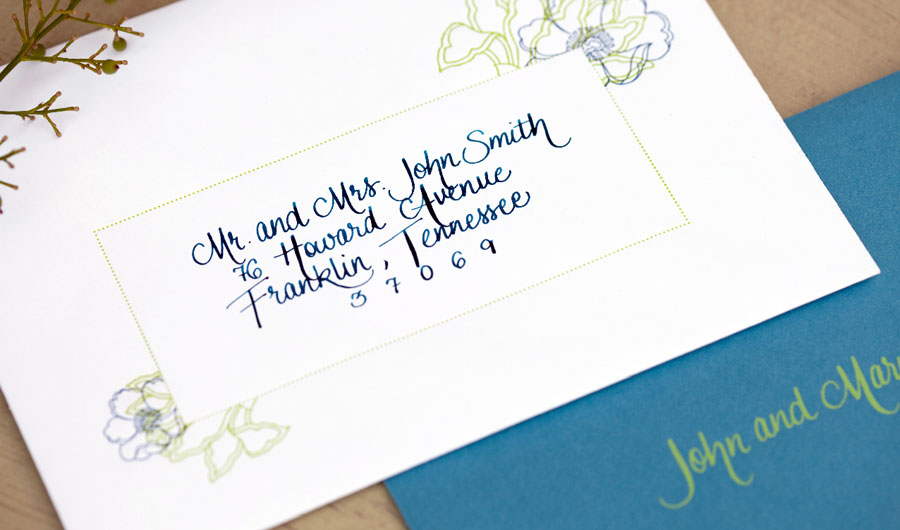
What’s Written on the Envelopes? The outer envelope is addressed with the names and address of the person(s) invited: Mr. and Mrs. John Smith. The inner envelope repeats the guests’ last names: Mr. and Mrs. Smith. It’s also fine to informally write the names of close relatives and friends: Grandmother, Aunt Sue, or Jessica and Henry on the inner envelope.

Addressing a married couple: Wedding invitations are always addressed to both members of a married couple, even though the bride and groom may know only one or think that only one will attend.

Addressing an unmarried couple living together: Invitations to an unmarried couple residing at the same place are addressed to Ms. Nancy Fellows and Mr. Scott Dunn.

Addressing a married woman doctor or two married doctors: If the woman uses her husband's name, the address is: Dr. Barbara and Mr. James Werner. If she uses her maiden name: Dr. Barbara Hanson and Mr. James Werner. If her husband is also a doctor and they use his last name, the address is either: The Doctors (or Drs.) Werner, or Drs. Barbara and Robert Werner.

Handwrite envelopes: Wedding invitations are special. Address them in handwriting—the bride’s, groom’s, friend’s, host’s, or a calligrapher’s. No computer-printed labels!

Avoid abbreviations: Street and Avenue are written out, although two-letter state abbreviations are okay (due to US Postal Service preference). A person’s middle name may or may not be used. If it is, write it in full instead of abbreviating; omit it if the name won’t fit on one line. It’s okay to abbreviate Mr.,Mrs., Ms., and Dr. when addressing envelopes.

Inviting guests for guests: Write "and Guest" on the inner envelope right after the invited guest’s name. If no inner envelope is used, the "and Guest" phase is not written on the outer one; instead a note is included in the invitation or a verbal invitation is extended by the couple: "Please bring someone with you."

Inviting children: If children are invited, their names are written on a line below their parents’ names on the inner envelope. If no inner envelope is used, children’s names are written on the outer envelope. Children aged thirteen and over usually receive their own invitations.

Using a return address: A return address is necessary for the US Postal Service. The USPS preferred place is the upper left-hand corner of the envelope, but the back flap is okay, too.

*Photo courtesy of Laura Ashbrook Photography

Happy Halloween weekend

Halloween weekend is here are we're feeling pretty stinkin' festive. Yes, it's true that we're about to set out on a journey to scrape together a semi-classy costume for tonight, but our procrastination has nothing to do with a lack of festivity- we've been BUSY!! In the spirit of this holiday weekend and with Thanksgiving on the horizon, we couldn't resist passing along a fun little D.I.Y from Martha Stewart. We're thinking of varying gold, copper and orange mini-glitter pumpkins for place cards at the Thanksgiving dinner table.

Find out how to make these cute little guys here. Have a very merry & safe Halloween weekend!

*Photo courtesy of Martha Stewart

DIY: Rosette ruffle pillows!

Seeing the final product of a Do-It-Yourself {DIY} is so exciting. Even just looking at the "recipe" for how to make it - to know all of the "ingredients" and the step - by - step directions, is inspiring in it self. Take this gorgeous ruffle pillow from Felt Furnishings, {via The Storque} for example...

You will need the following:

  • Feather pillow insert, 10 x 18" (25 x 45cm)
  • For the pillow cover: 23 1/2 x 19" (57 x 47cm) orange felt or felted woven-wool fabric
  • For the folded rosettes: 20 x 18" (50 x 45cm) orange felt or felted woven-wool fabric
  • Matching zipper, 18" (45cm) long — optional
  • Matching sewing thread
  • Basic sewing kit
  • Sewing machine

And here's how you make the magic happen:

1. If you wish to make a pillow back with a zipper, cut out three pieces of felt for the pillow cover — one piece measuring 11 x 19" (27 x 47cm) for the front and two pieces measuring 6 x 19" (14.5 x 47cm) and 6 1/2 x 19" (15.5 x 47cm) for the back. If you wish to make a sewn-in pillow back, cut the back panel to the same measurements as the front. To make the rosettes, cut out 60 felt circles with a 3" (7cm) diameter.

2. Pinch each felt circle in the middle, and fold the sides in to form a rosette. Hand-stitch the base of each folded rosette to hold it together.

3. Starting at one end of the front pillow panel, hand-stitch the rosettes onto the fabric, stitching neatly and securely through the base of each one.

4. Continue adding rosettes, positioning them very close together to form a dense, wide row of rosettes through the center of the pillow panel. Make sure that the row of rosettes is straight and that there is the same amount of undecorated base fabric on either side of the row.

5. Make up the pillow back and join the front and back following one of the two options below. Insert the pillow form into the finished cover.

For instructions on how to make up the pillow back, visit The Storque's posting. While you're there, find out more about what inspired this book on Felt design ideas and also be sure to peek at some of their other fantasticly fun DIY ideas!! Perhaps one of these days we'll post pics of our humble attempt at this... once we get our little paws on a sewing machine again :)

*Photos courtesy of Felt Furnishings